Planting Warm Weather Vegetables
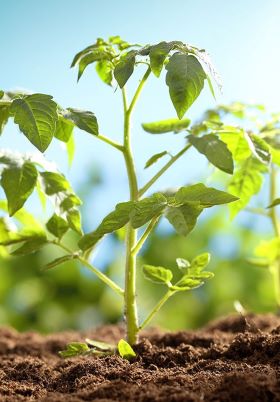
May is the time to plant warm weather vegetable seeds and seedlings in Connecticut.
We had a very cool, rainy spring in 2020. There were night temperatures in the 30s in
the third week of May! But now, suddenly and not surprisingly, the fourth week of May looks
good for transplanting those seedlings you have been carefully tending inside.
Some vegetables need warm weather to survive and grow. They usually take longer to produce the
food we eat. Because of their longer growth period, most gardeners start these vegetables
by seed indoors and transplant when the weather gets warm. If you didn't start seeds, many
nurseries have done this for you. All you need to do is buy your seedlings.
Common warm weather vegetables best planted as seedlings: Egglplant, Peppers, and Tomatoes.
Other warm weather vegetables need warm temperatures but grow very fast. These vegetables you
can plant as seeds directly into your garden outside. Sometimes you will see these vegetables
started in pots at the nursery but it is not necessary to use them.
Common warm weather vegetables successfully planted as seeds:
Beans, Cucumber, Pumpkin, Squash, and Zucchini.
What do you need?
- Seeds
- Seedlings
- trowel
- source of water
- plant marker
Let's get started!
Gardening Instructions
1. Preparing your garden bed:
By now your garden bed is prepared. If not see the tutorial on raised or trug garden beds.
Lettuce and radishes should be growing nicely and soon to be harvested. If your garden bed is new with new soil and compost, you have little
to worry about soil pH (acidity). However, if you are using an existing garden bed with existing soil, a soil
test is always recommended.
UCONN is still offering soil tests through the mail.
Now it is time to decide where you will plant your warm weather vegetables. These vegetables tend to be larger
and need more room. Quick Vegetable
Spacing Guide Here. I always use graph paper to plan my garden beds and use a spacing guide. In the
beginning of the growing season, your vegetables will look like they spaced too far apart. However, if you don't
consult a spacing chart, your vegetables will suffer from overcrowding and will be susceptible to disease.
2. Gathering your tools:
You already used a hoe and rake to prepare the soil. Now, all you need is a trowel to create a furrow
for seeds and planting holes for seedlings.
3. Follow instructions on the seed packet:
Read the instructions on the back of the seed packet to determine how deep your furrow should be. Most
warm weather vegetable seeds are large and easy to handle. You will notice in the instructions that some
vegetables are recommended to grow in hills instead of a furrow. Squash, zucchini and pumpkins are commonly
grown in hills.
4. Furrow or Hill:
If your vegetable is grown in a furrow, it is wise to plant seeds with at least 1/2 inch space between
to avoid the unappealing task of thinning seedlings later. Vegetables that are too crowded will not grow
well.
However, if it is recommended to grow in hills, push the soil into a mound keeping the proper spacing between
mounds. Put compost in half of the hole. Squash, zucchini, and pumpkins need lots of nutrients to
grow fast and large. Make three holes with your finger and put ONE seed in each hole. The smallest seedling
to emerge will be taken out.
5. Cover your seeds:
Use the trowel to gently pull soil back into the furrow to cover the seeds. Gently press the soil down with your hands or the back
of the trowel to hold the seeds in place during rain storms. If planting hills, cover the three holes with soil
and don't press down too hard to avoid flattening the hills.
6. Mark your seeds:
Even if you have written a garden diagram, it is still a good idea to mark your furrows with a plant marker to identify the vegetable
you planted there. Easy plant markers are plastic knives. You can use a permanent marker to write the name of the vegetable and its variety on the handle
and simply push the serrated half into the ground.
7. Preparing seedlings for the outside:
Seedlings do best if they have been "hardened off". Your seedlings have been living in an ideal climate
inside your home. The temperatures are consistly warm and there has been good lighting. If these tender
seedlings are suddenly thrust into the ground without getting used to outside conditions, the plants are
going to suffer. It is best to put your seedling trays out at least two hours every day for a week to get
the plants used to outside conditions. Make sure to water your pots when you bring them in. They will be dry
from evaporation.
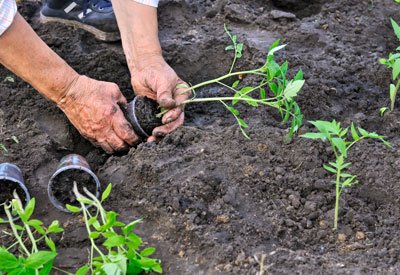
8. Planting seedlings in your garden:
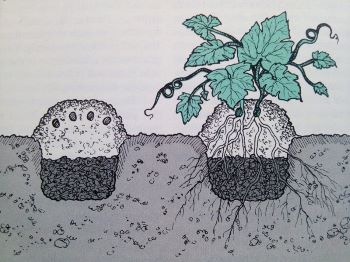
Tomatoes, peppers, and eggplant have the ability to grow roots along their stems, so when planting
these vegetable plants, plant deep; right up to the first set of leaves. This takes care of those leggy tomato
seedlings. Some gardeners believe those leggy starters will form a healthier plant than those with a more
compact form. Use your trowel to create a deep hole. Gently remove the seedling from its pot. Try not to pull
off its tender roots from the bottom of the pot. And absolutely avoid breaking off the stem! Gently place the
seedling in the hole and use your hands or trowel to move soil back around the plant.
9. Fertilize your seedlings:
Seedlings will benefit from a granular slow release fertilizer. A common formula is 10-10-10 which you
will find printed on the package. Sprinkle the granules around each plant.
10. Water your seeds:
Seeds must be kept constantly moist! Water your furrow every day. If a seed dries out it will not sprout.
This will be your most crucial gardening task. Once sprouted, you can water less frequently to avoid
drowning the plant. Seedlings should be watered as recommended to avoid drowning and root rot. More
instruction on watering your garden will be in the Maintaining Your Garden Tutorial.